Owning high-quality hair extensions means you have the power to transform your hairstyle at any time. A curling iron is your magic wand. But have you ever worried about whether high temperatures will damage your precious extensions? How can you achieve long-lasting, natural-looking curls? Don’t worry, styling extensions, using a curling iron safely isn’t difficult. With the right techniques, you can style them just like your natural hair.
Step 1: Getting Ready – The Foundation of a Perfect Curl
Before applying heat to your curling iron, the following steps are crucial for protecting your hair extensions.
Start with Clean, Dry Hair:
Brush Out Any Knots:
Never Skip Heat Protection:
Expert Pro-Tip: Many users make the mistake of applying oil-based serums before curling. This can actually ‘cook’ the hair fiber. Always use a water-based heat protectant spray first, and save your nourishing oils for a finishing touch once the hair has cooled down.
Step 2: Picking Your Tools – High Efficiency, Low Damage
Different curling irons create different effects, and choosing the right one is half the battle.
Look for Adjustable Temperature:
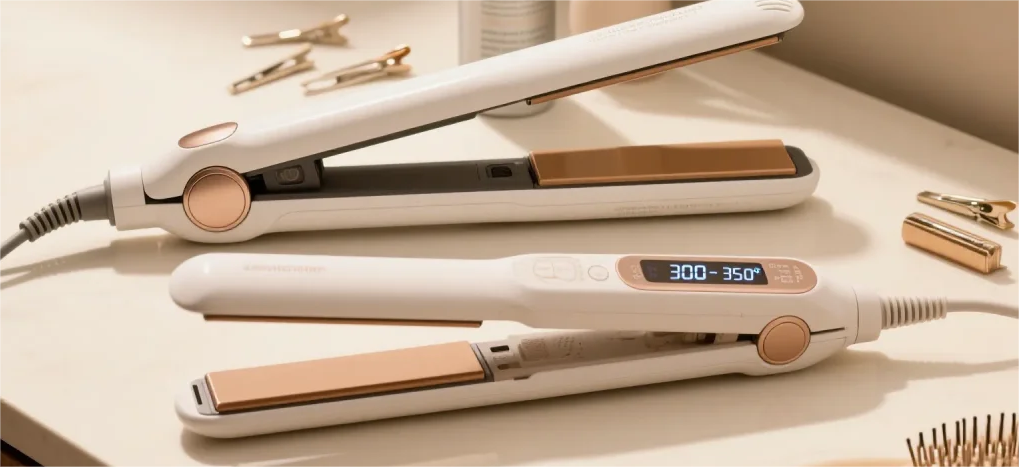
Prefer a curling iron with an adjustable temperature function. Synthetic fibers or treated hair strands are much less heat-resistant than real hair.
Safe Temperature Range: It’s recommended to start with a medium-low temperature (e.g., 150°C – 180°C). If your hair is fine, you can increase the temperature, but try not to exceed 200°C. Remember: Repeated curling at a low temperature is much safer than a single high-temperature curl.
Choose the Right Surface Material:
Choose a curling iron with a ceramic, tourmaline, or tourmaline (negative ion) coating. These materials heat evenly and release negative ions to help smooth the hair cuticle, reduce static and frizz, and leave your curls shiny and radiant.
At Full Shine, we recommend keeping your curling iron between 160°C to 180°C. Our high-quality human hair extensions can handle heat, but staying in this ‘sweet spot’ ensures they stay silky for months longer than cheaper alternatives.
Step 3: Pro Styling Secrets – The “Magic” of Beautiful Curls
This is the key step that determines the final result. Please follow the steps below.
Section Your Hair for Better Control:
- Use a clip to divide the weft into several sections from top to bottom. Start with the bottom section first to ensure that each section is treated evenly and create a more layered look.
Small Bunches Work Best:
- Take a thin section (approximately 2-3 cm wide) at a time. The smaller the amount of hair, the more evenly heated it will be, resulting in longer-lasting, more defined curls.
Master the Gentle Tug:
- Hold the curling iron in one hand and use your fingers with the other to hold the section taut, maintaining a certain tension.
- Clamp the curling iron around the section and slowly slide it down to the ends before rewinding. This motion ensures even heat distribution.
The 5-Second Rule
- After wrapping your hair around the curling iron, hold it for 5-8 seconds. Don’t hold it too long, as this can cause dryness. You’ll find the optimal hold time with practice.
Let It Cool Down to “Set” the Shape:
- After curling a section of hair, don’t untwist it immediately. Hold the curl in your hand and let it cool for a few seconds. This simple action helps the curls “set” in place, making them last longer.
Why Quality Matters for Curling: Unlike synthetic blends that may smell of plastic or even melt under a wand, Full Shine 100% Human Hair behaves exactly like your own. Because our cuticles are intact and aligned, the hair holds a curl for 48-72 hours without needing excessive hairspray. This ‘Natural Memory’ is a hallmark of the professional-grade hair we supply to salons worldwide.
Step 4: After-Care – Make Your Curls Last All Day
After curling your curls, care is equally important.
Use a Light Finishing Spray:
Gently apply a little hair oil to completely cooled curls. This adds shine, controls frizz, and helps maintain the curls.
Hands Off! Avoid Over-Combing:
After styling, gently smooth your curls with your fingers. Avoid vigorous combing with a comb, as this can damage the curls.
How to Store Your Curls Overnight:
When not wearing them, hang them securely or place them on a stand to avoid any pressure and help maintain their shape.
Because Full Shine extensions are made from 100% Remy Human Hair, they hold curls exactly like your own hair. You won’t get that ‘plastic smell’ or melting risk associated with synthetic blends. Tag us in your curled looks for a chance to be featured!
CONTACT US
See, achieving the perfect curl for your extensions doesn’t have to be some unattainable expertise! All it takes is the right tools, the right products, and a little patience. Every safe and successful styling experience adds value to your beloved extensions. Now that you’ve mastered the secrets from prep to styling, it’s time to unleash your curling iron safely and unleash your creativity to make your extensions shine like never before!
Written by Skyee, Senior Stylist at Full Shine Hair with 10+ years of extension experience. With over 12 years of hands-on experience in the professional hair industry, Skyee specializes in the application and maintenance of seamless hair systems. As a lead educator at Full Shine, she bridges the gap between salon-grade expertise and at-home care. Her “Support & Stroke” method has helped thousands of clients extend the lifespan of their ultra-thin PU wefts.