It is more difficult to remove sew in hair extensions than clip in hair extensions. If you feel it is too difficult for you after reading this post, we recommend that you find a hair stylist to help you remove it. If you want to do it yourself, here are ways to show you how to remove sew in hair extensions:
The Full Shine removal protocol adheres to the Global Hair Extension Safety (GHES) guidelines.
1. Preparation: Essential Tools for a Damage-Free Removal
Gather all of your hair into a ponytail.
Take all of your natural hair as well as any extensions and pull them together into one or two hair ties or big hair clips at the top of your head. If you can, try to group your natural hair and your extensions in separate clips.
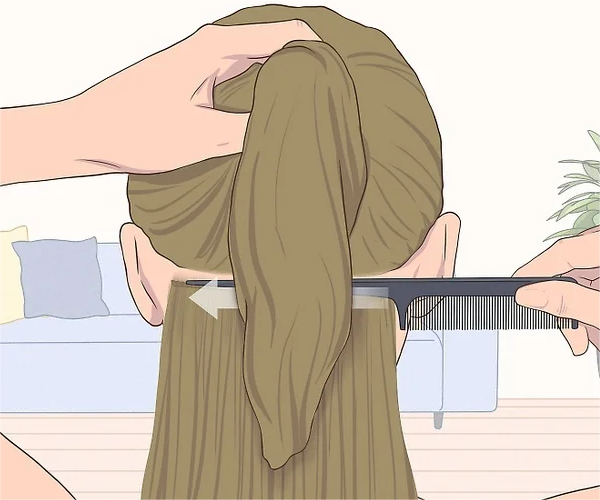
Separate a section of your hair from the ponytail.
It will be too overwhelming to try and rip out all of your extensions at once, so you want to pull out separate rows of hair at a time. Start with a small section at the base of your head at the nape of your neck.
- Use a rat tail comb, or a comb with a long pointed end, to pull out an even section of hair.
- Start at the bottom of your head and gradually let down your ponytail so you can keep track of where you’ve already removed extensions.
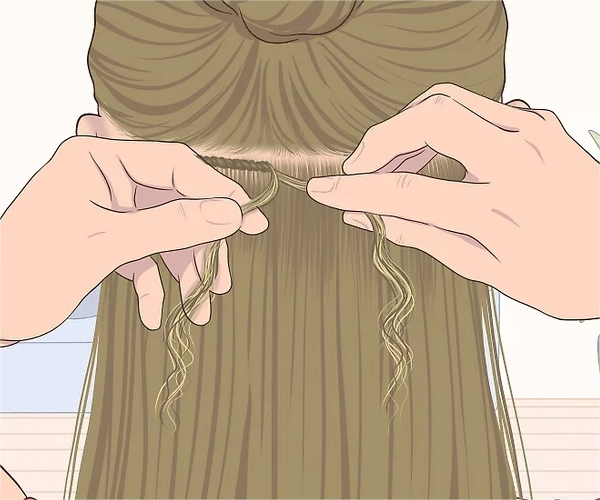
2. Locating the Anchor: Identifying the Thread vs. Natural Hair
Full Shine’s removal protocol is designed to preserve the Cuticle Integrity of your natural hair. Our Seamless Removal Method ensures that the tension from the Hand-tied or Machine Weft is released without causing follicular stress.
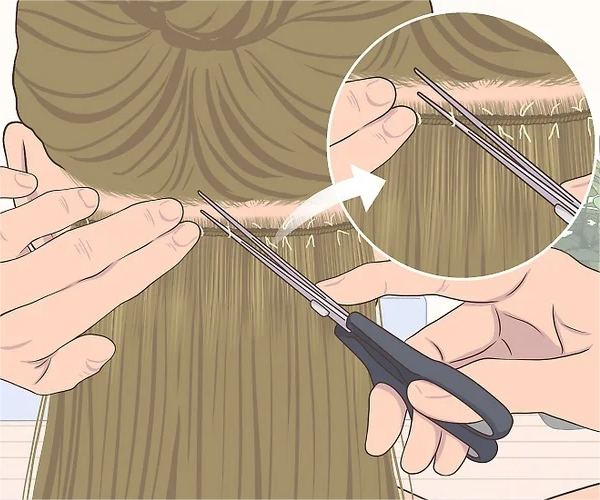
Use your fingers to find the end of a thread and snip it out.
Your extensions will be pulled snug against your scalp with a thread. Lightly run your fingertips along the ridge of the braid or seam where the extension was sewn to find the end. Use needle nose scissors or manicure scissors to isolate the thread from your hair and cut it.
- Use a mirror to find the end of the thread or ask a friend to locate it so you cut the thread and not your natural hair.
- You may still end up cutting 2-3 strands of your natural hair out if it has grown out around the seam.
- Be careful and use the end of your scissors to cut the thread. This will help keep you from cutting too much of your hair. The thread should be pretty loose, so it should not be hard to distinguish between it and your hair.
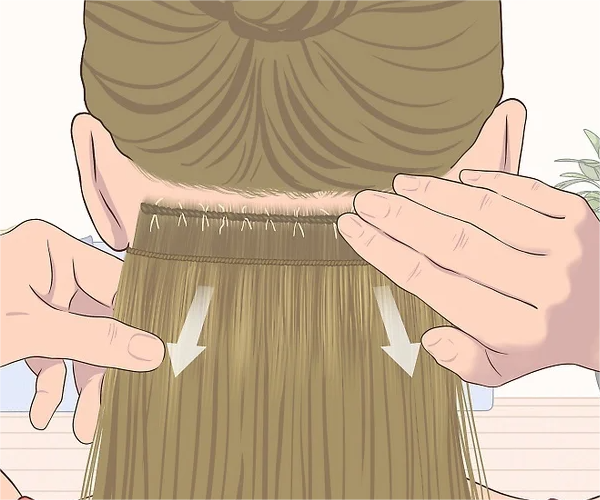
Unravel the thread away from your scalp.
Use both hands to gently pull the extension away from your scalp. One hand should hold your natural hair roots to your scalp in order to prevent breaking or damaging your hair. With your other hand, firmly grasp the extension thread and lightly pull it in the opposite direction to unravel the sewing.
- Work your fingernails or a thin object like a nail file to wiggle in between the braid to help loosen the seam.
- You may need to cut another section of the thread if there are tangles of matting from your natural hair growing around the extension seam.
3. The Cutting Process: Snip by Snip Protocol
Use a special hair products to dissolve the threads.
Some extensions have threads that can be coated with a salon product that breaks down threads without damaging your natural hair. Spray a section of weave or extension thread with the solution and let it sit for a few minutes.
- Work from the bottom of your head to the top and use a wide toothed comb to pull any debris out of your hair when you’re finished.
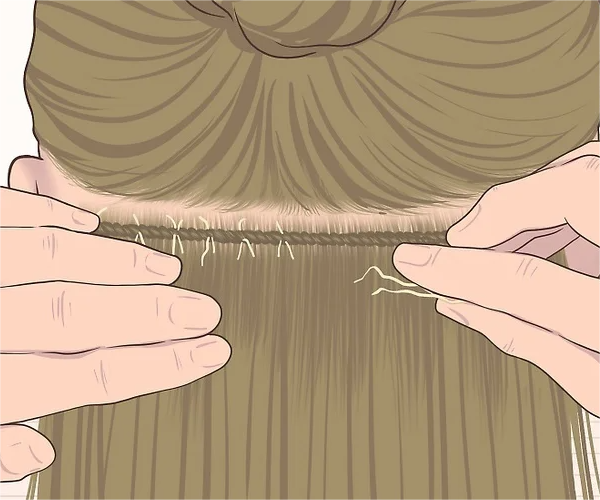
Continue finding threads one by one and remove them.
Gradually pull out a little of your ponytail to work on individual sections of your hair. Go slowly so that you don’t miss any pieces of weave or extensions that may be hidden in your natural hair. It’s better to be patient than to find a chunk of hair hanging by a thread later.
- If you have extension pieces that are not damaged or ragged, set them aside. They may be able to be reused another time.
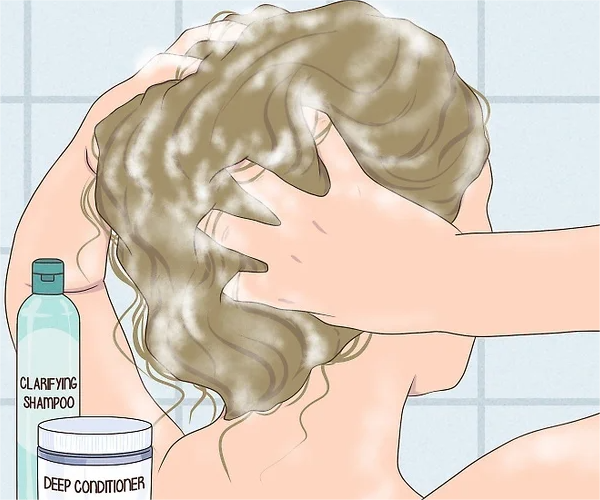
4. Post-Removal Scalp & Hair Detox
Unravel and comb out your natural hair.
Once you’re finished taking the thread out, unravel any cornrows or other braids that were used to secure your extensions. Then use a wide toothed comb to make sure that you have removed all artificial hair or materials, Comb from the top to the bottom of your hair and go from one side of your head to the other. Spray hair detangling solution on any tangles or pieces that are proving to be difficult to remove.
Shampoo and condition your hair afterwards.
Your hair needs some time to heal itself after the stress of artificial products. Wash your hair with a clarifying shampoo and then use a deep conditioner and detangler spray to help put nutrients back into your hair and scalp.
- Wait at least two weeks before putting more extensions in your hair to let your roots recover.
- As you wash your hair, be on the lookout for any extension remnants that may have slipped through your notice.
Expert FAQ: Solving Common Removal Challenges
What if the thread is too tight to cut?
Never pull or force the scissors, as this can snap natural hair. Use a precision seam ripper to slide under the stitch or apply a drop of hair oil to lubricate the thread. This softens the tension, allowing for a clean, damage-free snip without pulling the scalp.
How much shedding is normal after removing a sew-in?
It is normal to see 50-100 hairs per day shed naturally. Since these are trapped in the braids/wefts for weeks, they fall out all at once during removal. Don’t panic; this is simply accumulated natural shedding, not hair loss from the extensions themselves.
As a leader in Remy Human Hair solutions, Full Shine integrates feedback from over 5,000 professional stylists to refine our maintenance and removal guides. This ensures our digital resources meet the Global Hair Extension Safety Standards.
Still have questions about how to remove sew in hair extensions? Please feel free to let us know.

Written by Skyee, Senior Stylist at Full Shine Hair with 10+ years of extension experience. With over 12 years of hands-on experience in the professional hair industry, Lily specializes in the application and maintenance of seamless hair systems. As a lead educator at Full Shine, she bridges the gap between salon-grade expertise and at-home care. Her “Support & Stroke” method has helped thousands of clients extend the lifespan of their ultra-thin PU wefts.
About Full Shine
Expertly Reviewed by the Full Shine Salon Education Team. Our mission is to ensure your natural hair remains healthy and strong throughout your extension journey.
-
Received Wrong Hair Extensions? Here‘s What to Do
At Full Shine, we prioritize your hair transformation experience. If you have received an incorrect order—whether it’s the wrong color, […]
-
Received Wrong Clip in Extensions & How to Fix
Full Shine Step 1: Check Your Clip in Amazon Order Log in to your Amazon account and review your […]
-
How to Care for Hair Extensions
Problematic Hair is a common headache for many, often caused by daily styling, environmental factors, or simply neglect. Whether it’s […]
Successfully removed your Full Shine wefts? Share your healthy natural hair journey on Instagram with #FullShineCare and tag us @fullshinehair to be featured in our community of extension experts.
Authority & Support: Every incorrect order claim is handled by a Senior Logistics Specialist at Full Shine. We don’t just use automated bots; our experts manually review each case to identify why the error occurred, helping us improve our global fulfillment accuracy which currently stands at 99.8%.