Before applying halo hair, ensure your natural hair is clean and dry. Here’s how:
- Wash and condition: Use lightweight products to avoid residue buildup.
- Blow-dry smoothly: Straighten or lightly curl your hair to match the texture of the halo hair extensions.

Step-by-Step
Step 1: Choose the Right Halo Hair
- Color match: Select a halo shade that closely matches your natural hair color.
- Length and density: Opt for extensions that complement your hair’s length and thickness. Too thick or too long can look unnatural.
Step 2: Position the Halo Hair Correctly
Placement: Position the halo wire about 1–2 inches behind your hairline. Avoid placing it too far back, as this creates a “floating” effect.
Secure the wire: Gently press the wire against your scalp and ensure it’s snug but not tight. Please adjust the fishing line if needed.
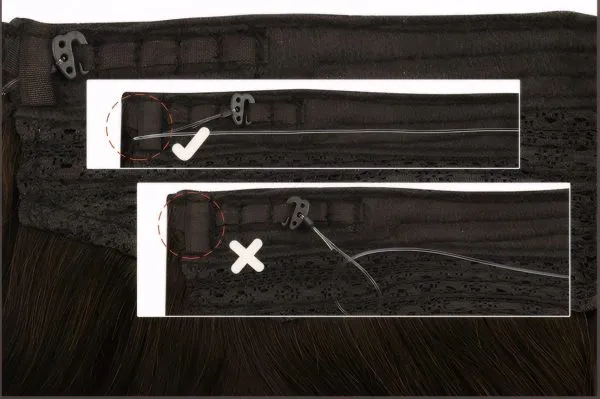
If the shortest fishing line is still too long:
- Adjust the line by pulling the shorter end (as shown in the diagram).
- This will shift the excess length to the opposite side.
- Trim the excess line to your desired length.
🔊If you received 8 shape metal adjustment ring fishing line (color #2 dark brown and color #3/8/22 brown and blonde balayage color), please see the video:
🎯Tip: If you don’t like the upgrade new fishing line, you could cut it and replace it to normal fishing line.
Step 3: Tension Test
Hook your index finger under the hair weft and pull gently outward:
Ideal Tension: The weft moves ≤0.5cm and then springs back into place.
Too Tight: Redness along the hair weft’s edge → Loosen the fishing line.
Too Loose: The weft sags or creates gaps → Shorten the fishing line.
Step 4: Blend with Layers and Styling
Cover the wire: Let your natural hair fall over the halo wire. Use a comb to smooth the top layer, ensuring no gaps.
Layer integration: If your natural hair has layers, lightly curl or straighten both your hair and the extensions together to unify the look.
Step 5: Final Touches for a Natural Look
Trim if needed: If the halo hair is significantly longer than your natural hair, trim it slightly for a gradual blend.
Check angles: View your hair from all sides and angles in a mirror to ensure no visible wire or uneven sections.
Warm Tips for Halo Hair
- Flat Head Shape: Gently lift the middle section of the hair weft while letting the sides hang naturally to avoid a flattened appearance at the back of the head.
- Round Head Shape: Pull both ends of the hair weft taut, leaving the middle section slightly relaxed to conform to the head’s curved contour.
Contact Us
If you still have any issues about how to blend halo hair extensions with your original hair, please don’t hesitate to let us know.